jQueryのwrap()メソッドを使うと指定のHTML要素を囲む事が可能です。jQuery初心者向けに簡単なサンプルコードと共に解説します。
目次
1. wrap()メソッドでHTML要素を囲む方法
「wrap()メソッド」の使い方について、実際のサンプルコードで動作を確認してみましょう。「jQuery_Sample1.html」をコピーして、任意の場所に保存して下さい。

●jQuery_Sample1.html --------------------
<!DOCTYPE html>
<html lang="ja">
<head>
<meta charset="utf-8">
<title>Introduction to jQuery</title>
<script src="https://ajax.googleapis.com/ajax/libs/jquery/3.3.1/jquery.min.js"></script>
<script>
$(document).ready(function(){
$("button").click(function(){
$("p").wrap("<div></div>");
});
});
</script>
<style>
div{
background-color: #aaa;
}
</style>
</head>
<body>
<button>ボタンをクリック</button>
<p>コンテンツ1</p>
<p>コンテンツ2</p>
</body>
</html>
--------------------
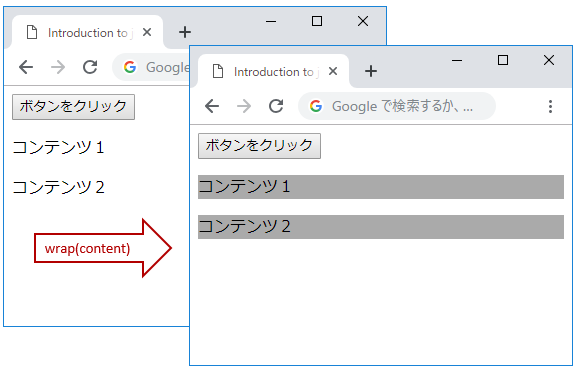
wrapメソッドを実行すると、段落タグを指定の「divタグ」で囲みます。
サンプルコードのボタンをクリックすると、divタグで囲まれたテキストの背景色がグレー(background-color: #aaa;)に変わります。
▲ページトップへ戻る
2. wrap()メソッドでHTML複数の要素でHTML要素を囲む方法
「wrap()メソッド」を使って、複数のHTML要素で特定の要素を囲んでみましょう。
サンプルコードの「jQuery_Sample2.html」をコピーして、任意の場所に保存して下さい。

●jQuery_Sample2.html --------------------
<!DOCTYPE html>
<html lang="ja">
<head>
<meta charset="utf-8">
<title>Introduction to jQuery</title>
<script src="https://ajax.googleapis.com/ajax/libs/jquery/3.3.1/jquery.min.js"></script>
<script>
$(document).ready(function(){
$("button").click(function(){
$("span").wrap("<div><p><strong></strong></p></div>");
});
});
</script>
<style>
div{
color: #006DD9;
}
</style>
</head>
<body>
<button>ボタンをクリック</button>
<p>コンテンツ1</p>
<span>コンテンツ2</span>
</body>
</html>
--------------------
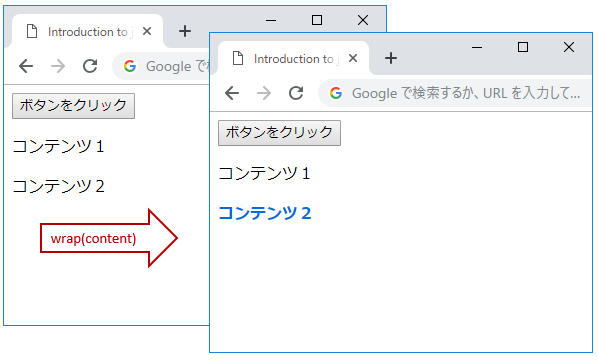
「ボタン(button)要素」、「段落(p)要素」、「スパン(span)要素」からなるHTMLコードの内、「スパン(span)要素」を指定の要素で囲みます。wrapメソッドを実行すると「コンテンツ2」のテキストは青色(color: #006DD9)の太字(strong)になります。
▲ページトップへ戻る
3. wrap()メソッドの関数を使ってHTML要素を囲む方法
「wrap()メソッド」の関数を使って指定要素の複数のHTML要素を追加する事ができます。
サンプルコードの「jQuery_Sample3.html」をコピーして、任意の場所に保存して下さい。

●jQuery_Sample3.html --------------------
<!DOCTYPE html>
<html lang="ja">
<head>
<meta charset="utf-8">
<title>Introduction to jQuery</title>
<script src="https://ajax.googleapis.com/ajax/libs/jquery/3.3.1/jquery.min.js"></script>
<script>
$(document).ready(function(){
$("button").click(function(){
$("p").wrap(function() {
return '<div id="' + $(this).text() + '" />';
});
});
});
</script>
<style>
#apple {
color: #B20000;
}
#peach {
color: #FF9696;
}
</style>
</head>
<body>
<button>ボタンをクリック</button>
<p>apple</p>
<p>peach</p>
</body>
</html>
--------------------
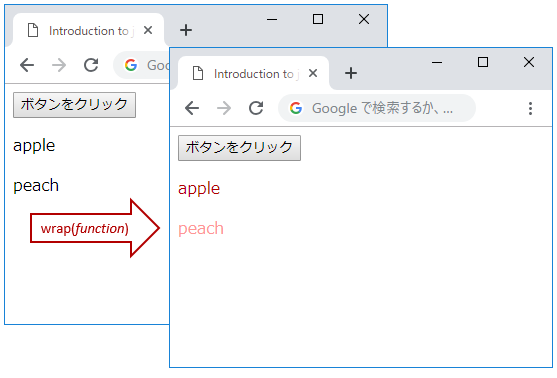
サンプルコード(jQuery_Sample3.html)のボタンをクリックすると、「apple」の文字色は赤、「peach」の文字色はピンクに変わります。wrapメソッドの引数に関数を指定する事で、段落タグのテキストを取得します。取得したテキストを「divタグ」のid属性の属性値として設定する事で、id属性に応じた色の指定が可能になりました。
▲ページトップへ戻る
関連記事:jQueryのダウンロードから使い方まで
関連記事:jQuery入門~導入から基本の使い方まで~
関連記事:現場で使えるjQueryプラグイン22選
関連記事:jQuery入門オススメ本 7選
関連記事:jQueryのhideメソッドで要素を非表示にする方法
関連リンク:jQuery API Documentation(wrap)
![]()
![]()
![]()
